EdenPolis


InstaFilter

Hacking with Swift

Day 67 / 100

App Demo:

Mastodon Video


Today I want to share how I approached 3 challenges at the end of InstaFilter project and how I furhter imporved it!

In addition I will go over changes made to the UI so it doesn’t look so plain and boring.

Today involved:
  • Disabling Button / Slider when photo was not selected
  • Adding multiple Sliders to control filter attributes
  • Adding multiple Filters with different attributes
  • Beautifying the UI
  • Bruteforcing improvements!
    (kind of working code)


Note: I just cover the challenges in this post, since it was a guided project and you can get step by step instruction by Paul from Hacking with Swift.
Before
After

Project before changes


I think it’s important to understand what we are working with. On the right(or below - depending on your device), you have the full code from ContentView that corresponds with the screenshot labeled before.

To quickly summarise. We greet user with a PhotosPicker, that allows them to select image from their Photo Library, It’s a nice ContentUnavailableView describing actions needed to be taken by the user aka select a picture.

Once the picture has been selected, we are looking at transformed by filters Swift UI Image (only image type that can be displayed in SwiftUI).

Depending on the CIIFilter the user chose, they can adjust the values with Slider and watch the image transform in real time.

There are few hiccups:
  • Each filter has multiple attributes / keys and currently we can only adjust one value or multiple values are adjusted at the same time with one slider.
  • Some keys accept different data types like CIVector (inputCenter) or Float (inputAngle).
  • Each has different minimum and maximum allowed value
  • Each filter has a different combination of those properties that make up the filter


I think the most interesting part of todays post will be “Bruteforcing Improvements”, I succeeded in some ways to achieve my goal, I discovered new solutions to issues and pushed myself to come up with some solution.

Show ContentView before changest


import SwiftUI
import PhotosUI
import CoreImage
import CoreImage.CIFilterBuiltins

struct ContentView: View {
    @State private var processedImage: Image?
    @State private var filterIntensity = 0.5
    @State private var beginImage: CIImage?
    
    @State private var selectedItem: PhotosPickerItem?
    
    @State private var currentFilter: CIFilter = CIFilter.sepiaTone()
    let context = CIContext()
    
    @State private var showingFilters = false
    
    var body: some View {
        NavigationStack {
            VStack {
                Spacer()
                PhotosPicker(selection: $selectedItem) {
                    if let processedImage {
                        processedImage
                            .resizable()
                            .scaledToFit()
                    } else {
                        ContentUnavailableView("No Picture", systemImage: "photo.badge.plus", description: Text("Tap to import a photo"))
                    }
                }.buttonStyle(.plain)
                    .onChange(of: selectedItem, loadImage)

                Spacer()

                HStack {
                    Text("Intensity")
                    Slider(value: $filterIntensity)
                        .onChange(of: filterIntensity, applyProcessing)
                }
                .padding(.vertical)

                HStack {
                    Button("Change Filter", action: changeFilter)

                    Spacer()

                    // share the picture
                }
            }
            .padding([.horizontal, .bottom])
            .navigationTitle("Instafilter")
            .confirmationDialog("Select a filter", isPresented: $showingFilters) {
                Button("Crystallize") { setFilter(CIFilter.crystallize()) }
                Button("Edges") { setFilter(CIFilter.edges()) }
                Button("Gaussian Blur") { setFilter(CIFilter.gaussianBlur()) }
                Button("Pixellate") { setFilter(CIFilter.pixellate()) }
                Button("Sepia Tone") { setFilter(CIFilter.sepiaTone()) }
                Button("Unsharp Mask") { setFilter(CIFilter.unsharpMask()) }
                Button("Vignette") { setFilter(CIFilter.vignette()) }
                Button("Cancel", role: .cancel) { }
            }
        }
        
    }
    
    func changeFilter() {
        showingFilters = true
    }
    
    func loadImage() {
        Task {
            guard let imageData = try await selectedItem?.loadTransferable(type: Data.self) else { return }
            guard let inputImage = UIImage(data: imageData) else { return }

            guard let beginImage = CIImage(image: inputImage) else {return}
            
            currentFilter.setValue(beginImage, forKey: kCIInputImageKey)
            applyProcessing()
        }
    }
    
    func applyProcessing() {
        let inputKeys = currentFilter.inputKeys

        if inputKeys.contains(kCIInputIntensityKey) { currentFilter.setValue(filterIntensity, forKey: kCIInputIntensityKey) }
        if inputKeys.contains(kCIInputRadiusKey) { currentFilter.setValue(filterIntensity * 200, forKey: kCIInputRadiusKey) }
        if inputKeys.contains(kCIInputScaleKey) { currentFilter.setValue(filterIntensity * 10, forKey: kCIInputScaleKey) }

        guard let outputImage = currentFilter.outputImage else { return }
        guard let cgImage = context.createCGImage(outputImage, from: outputImage.extent) else { return }

        let uiImage = UIImage(cgImage: cgImage)
        processedImage = Image(uiImage: uiImage)
    }
    
    func setFilter(_ filter: CIFilter) {
        currentFilter = filter
        loadImage()
    }
}


Show Swift snippet


var buttonDisable: Bool {
        processedImage == nil
}

VStack {
   // Sliders
   // Button
}
.disable(buttonDisable)


Disabling Button and Sliders

That’s the easiest of the bunch. I simply created a computed property that checks if @State private var processedImage: Image? is nil or not. Meaning, if the user selected any image from their library to be uploaded to the app it will be false.

Now, simply attach it to the VStack that nests Sliders and Button. (See in the code snippet).

Note: if you have PhotosPicker in the same VStack it will disable user's ability to add picture.


More control with multiple Sliders


In this step I will just hardcode all the sliders (in Bruteforcing improvements I will show how it can be partially automated so we don’t see all filters at all times - just the ones relevant to the currentFilter).

First, we need to know what attributes a filter has. we need properties to store values for different filter parameters. The way I approached it was to place this line of code in setFIlter function (but can be wherever you want) //print(CIFilter.keleidoscope().attributes) Whenever you want to see particular filter attributes you can just adjust it and see exactly what values need to be stored, what’s. Max/min, what data type is needed.

Let’s work on an example of Kaleidoscope, since it’s my favorite filter. On the right (or below) is a snippet of what you would see.

There are three distinct attribute types above, Scaler, Position and Angle. Each must be treated differently.

Since Slider we work with currently is a Double from 0 to 1, we take that input and adjust it inside the applyProcessing() to match the current data type and allowed values.

With Count, we see there’s a range from 1 to 64. We can create property called filterCount that’s an Int, wrap it in @State and bind to a Stepper in range 1…64.

In applyProcessing we create a new if statement for kcIInputCount and pass the value from filterCount to adjust the filter amount.

In Bruteforcing Improvements this will be adjusted to unify the look of the app (Sliders only) and allow for a bit of automation (SliderView will be automatically generated for each attribute and bound to a correct property created in ContentView).
I think it’s worth it, but you might disagree.

Another approach can be seen on Center attribute. We can make filterCenter property a Double and bind it to a Slider. Then in applyProcessing() wrap the value of center filter inside the CIVector (we know it’s necessary from printing out the attributes). Since we are passing minuscule values like 0.1 or 0.5, multiply it to actually see some changes.

inputKeys.contains(kCIInputCenterKey) { currentFilter.setValue(CIVector(x: filterCenter * 100, y: filterCenter * 100), forKey: kCIInputCenterKey) }

With Angle I repeated the steps for Center, but multiplied filterAngle by 3.14.

A big downside of this approach is that all Sliders are visible at all times, which to be honest is my biggest issue.

Why would I need to see Angle, Center, Count when CIFIlterSepiaTone has just one input attribute of Intensity (ignore inputImage - we already took care of that with loadImage).

This creates confusion - adjusting them does nothing for SepiaTone, disabling them still feels pointless (you can see them), making them invisible still takes up space.

As you can see there are some limitation on how this process could be automated due to the sheer amount of attributes, data types, mix/max values (if there are any).

I made some sacrifices in Bruteforcing Improvements in order to not have all the irrelevant Sliders and only show Sliders that are needed to make changes to a currentFilter.

Show Keleidoscope attributes


["CIAttributeFilterAvailable_Mac": 10.4, "inputAngle": {
    CIAttributeClass = NSNumber;
    CIAttributeDefault = 0;
    CIAttributeDescription = "The angle in radians of reflection.";
    CIAttributeDisplayName = Angle;
    CIAttributeIdentity = 0;
    CIAttributeSliderMax = "3.141592653589793";
    CIAttributeSliderMin = "-3.141592653589793";
    CIAttributeType = CIAttributeTypeAngle;
}, "CIAttributeFilterAvailable_iOS": 9, "inputImage": {
    CIAttributeClass = CIImage;
    CIAttributeDescription = "The image to use as an input for the effect.";
    CIAttributeDisplayName = Image;
    CIAttributeType = CIAttributeTypeImage;
}, "inputCount": {
    CIAttributeClass = NSNumber;
    CIAttributeDefault = 6;
    CIAttributeDescription = "The number of reflections in the pattern.";
    CIAttributeDisplayName = Count;
    CIAttributeMin = 1;
    CIAttributeSliderMax = 64;
    CIAttributeSliderMin = 1;
    CIAttributeType = CIAttributeTypeScalar;
}, "CIAttributeFilterName": CIKaleidoscope, "inputCenter": {
    CIAttributeClass = CIVector;
    CIAttributeDefault = "[150 150]";
    CIAttributeDescription = "The center of the effect as x and y pixel coordinates.";
    CIAttributeDisplayName = Center;
    CIAttributeType = CIAttributeTypePosition;
 

Adding Filters

To make the app more interesting we need to add more filters, as mentioned before my favorite one is a Kaleidoscope.

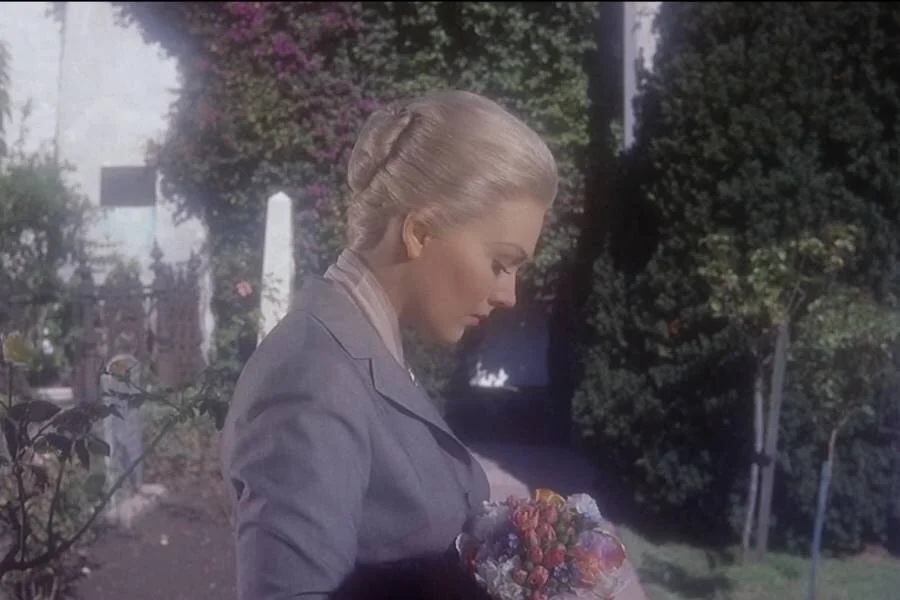
I like Bloom, it reminds me of a diffusion filter used in movies for close-up of an actresses or to showcase a beautiful sunny day by slightly blurring the image, making it “bloom”, glow. We get both in Hitchcock’s Vertigo in the garden scene.

I repeated the steps of looking up the attributes of the filter (it has Intensity and Radius), creating @State property as Double and modifying it in applyProcessing to more or less match the range (multiply by 100 for Radius). To allow user to select the Bloom filter I added a Button in .confirmationDialog. Same steps need to be folowed for adding different filters.

Beautifying the UI


The biggest issue I had was the misalignment of Sliders based on the attribute name length. There’s a quick solution by adding a relative width to Text element, for me worked 0.25. If your attribute is longer you might want to increase it.

Text("Sharpness")
.containerRelativeFrame(.horizontal) { size, axis in size * 0.25 }


Another jarring element was background, since we are doing something creative and playful in the app, I wanted to find the background that will suit it.

The image seen is by Vincent Maurer on Unsplash. He has some stunning backgrounds to choose from and I’m glad I found his page!

I did some experimenting on how to preserve the ratio of the image and here’s what worked for me.

.background(Image(.background).resizable().scaledToFill().ignoresSafeArea())

Now that I had a background my text was too dark, including the .navigationTitle, I fixed it by applying a .preferredColorScheme(.dark). It will automatically apply white to all text elements.

For a Change Button I went with orange, it adds a nice pop of color. Added rounded corners to go with a more fluid / wavy background.

Button("Change Filter", action: changeFilter).disabled(buttonDisable).padding(7).background(.orange.opacity(0.8)).clipShape(RoundedRectangle(cornerRadius: 20)).foregroundStyle(.white) }

To polish the UI I changed the color of the Sliders with .tint view modifier.

.tint(.cyan.opacity(0.8))
Before
After

Crystalize
Bloom

BruteForcing the Improvements


As I mentioned earlier, the biggest issue I had with this app is that all filters are showcased at all times. It can be confusing for the user, it’s not aesthetically pleasing nor it’s functional.

It took me a bit of time to come up with a decent solution. I knew I needed a separate SliderView to display the slider, name of the attribute and bind it to a property that would then adjust the attribute value of the current filter.

In ContentView I added a ForEach to iterate through attributes of currentFilter and generate the SliderView.

First, let’s create a SliderView according to my previous description. You might see that I removed the prefix “input” since that’s the actual name of the key / attribute.

SliderView


import SwiftUI
struct SliderView: View {
var key: String

@Binding var value: Double
@Binding var currentFilter: CIFilter
var body: some View {
    VStack {
        HStack {
            Text(String(key).trimmingPrefix("input"))
            .containerRelativeFrame(.horizontal) { size, axis in
            size * 0.25
            }
            Slider(value: $value)
        }
    }
}
}


Now that’s out of the way, how to actually pass the property to be bound. If you have only one value property, then all attributes end up with the same value, each slider controls all attributes. Not ideal.

If I have multiple properties to store values for each Slider, then how do I determine which one to pass?

Initially, I tried to return a value and precede it with binding ($), but that’s not how it works.

Answer was pretty straightforward, create a function that returns Binding. It’s a series of if statements, we pass the key and based on its value we return the correct property with binding.

In case the filter has some property I have not accounted for I added a generic safety value property, which is there to catch any exceptions.

determineValue()


func determineValue(_ key: String) ->  Binding {
    
    if key == kCIInputIntensityKey {
        return $filterIntensity
    }
    if key == kCIInputRadiusKey {
        return $filterRadius
    }
    if key == kCIInputScaleKey {
        return $filterScale
    }
    if key == kCIInputAngleKey {
        return $filterAngle
    }
    if key == kCIInputSharpnessKey {
        return $filterSharpness
    }
    if key == kCIInputCountKey {
        return $filterCount
    }
    if key == kCIInputCenterKey {
        return $filterCenter
    }
    else {
        return $value
    }
}


Then, how to know which property we need to watch? Previously this was hardcoded to each Slider, we can’t watch for one specific property, it might not even be relevant to the currentFilter.

We need another function, a copy of determineValue but this time returning Double, not Binding.

determineValue2Watch()


func determineValue2Watch(_ key: String) -> Double {
    if key == kCIInputIntensityKey {
        return filterIntensity
    }
    if key == kCIInputRadiusKey {
        return filterRadius
    }
    if key == kCIInputScaleKey {
        return filterScale
    }
    if key == kCIInputAngleKey {
        return filterAngle
    }
    if key == kCIInputSharpnessKey {
        return filterSharpness
    }
    if key == kCIInputCountKey {
        return filterCount
    }
    if key == kCIInputCenterKey {
        return filterCenter
    }
    else {
        return value
    }
}


I tried some other solutions but it wasn’t working as I wanted, required different sacrifices to the functionality (which filters could be used) etc.

I found another great solution on Hacking with Swift Forum, it involved writing to a protocol but it had limitations such as attribute types. Click below to see it!

That concludes this project and I’m happy that I pushed myself to improve it to my liking! If you are reading this, thank you for sticking with this long post! I appreciate it!